
Intel NUC10i5FNKN
Intel NUC 10 Performance NUC10i5FNKN Barebone համակարգի օգտագործողի ձեռնարկ
Model: NUC10i5FNKN
1. Ներածություն
This manual provides comprehensive instructions for setting up, operating, maintaining, and troubleshooting your Intel NUC 10 Performance NUC10i5FNKN Barebone System. The Intel NUC (Next Unit of Computing) is a small form factor PC kit designed for flexibility and customization. As a barebone system, it requires the user to install memory (RAM), storage (SSD/HDD), and an operating system to become fully functional.
Please read this manual carefully before beginning the installation process to ensure proper setup and operation.

Նկար 1: Intel NUC 10 Performance NUC10i5FNKN Barebone System. This image shows the compact design of the NUC, featuring a black chassis with various ports on the front and ventilation on the side.
2. Ի՞նչ կա տուփի մեջ
Ստուգեք, որ բոլոր իրերը առկա են փաթեթում.
- NUC 10 Performance kit - NUC10i5FNKN
- US Cord (Power Adapter)
Note: Memory, storage, and operating system are not included and must be purchased separately.
3. Կարգավորում և տեղադրում
This section guides you through the physical installation of components and initial setup.
3.1. Հիշողության (RAM) տեղադրում
- Unscrew the bottom cover of the NUC chassis.
- Locate the DDR4 SO-DIMM slots on the motherboard.
- Align the notch on the SO-DIMM module with the notch in the slot.
- Insert the module at a 45-degree angle and push down until the retaining clips snap into place.
- Repeat for additional memory modules if applicable.
3.2. Installing Storage (SSD/HDD)
The NUC10i5FNKN supports both M.2 SSDs and 2.5-inch SATA drives.
3.2.1. M.2 SSD-ի տեղադրում
- Տեղադրեք M.2 բնիկը մայր տախտակի վրա:
- Remove the small screw at the end of the M.2 slot.
- Տեղադրեք M.2 SSD-ն անցքի մեջ անկյան տակ։
- Gently push down the SSD and secure it with the screw.
3.2.2. 2.5-inch SATA Drive Installation
- Mount the 2.5-inch drive into the drive bay bracket (if provided).
- Connect the SATA data and power cables from the motherboard to the drive.
- Secure the drive bay bracket within the chassis.
After installing memory and storage, reattach the bottom cover.
3.3. Ծայրամասային սարքերի միացում
Connect your monitor, keyboard, mouse, and other necessary devices to the NUC.

Նկար 2: Front panel ports of the Intel NUC 10. This image highlights the front USB 3.1 Gen2 ports (Type-A and Type-C) for connecting various peripherals, along with the power button and headphone jack.

Նկար 3: Rear panel ports of the Intel NUC 10. This image displays the power input (19V), HDMI port, Ethernet port, two USB 3.1 Gen2 Type-A ports, and a USB-C port with Thunderbolt 3 support, allowing for diverse connectivity options.
- Մոնիտոր: Connect your display to the HDMI port on the rear panel. The NUC supports up to 4096x2304 resolution.
- Ստեղնաշար/Մկնիկ. Connect to any available USB ports (front or rear).
- Ցանց: Միացրեք Ethernet մալուխը RJ45 միացքին՝ լարային ցանցին մուտք գործելու համար։
- Հզորությունը: Connect the power adapter to the 19V DC input on the rear panel, then plug the power cord into an electrical outlet.
3.4. Օպերացիոն համակարգի տեղադրում
Once all hardware is installed and peripherals are connected, you will need to install an operating system (e.g., Windows 10, Linux). Refer to the operating system's installation guide for detailed steps. You may need to create a bootable USB drive for installation.
4. Գործառնական հրահանգներ
4.1. Միացում/անջատում
- Միացում՝ Press the power button located on the front panel. The power button will illuminate when the system is on.
- Անջատել: Use the operating system's shutdown procedure. Alternatively, press and hold the power button for 4 seconds to force a shutdown (use only when necessary).

Նկար 4: Close-up of the Intel NUC 10 front panel, showing the illuminated power button. This button is used to turn the system on and off.
4.2. Using the SD Card Slot
The NUC 10 Performance features an SDXC card slot with UHS-II support on the left side panel. This allows for easy transfer of photos, videos, and other data from compatible memory cards.
- Insert the SD card into the slot until it clicks into place.
- To eject, push the card in slightly until it springs out.
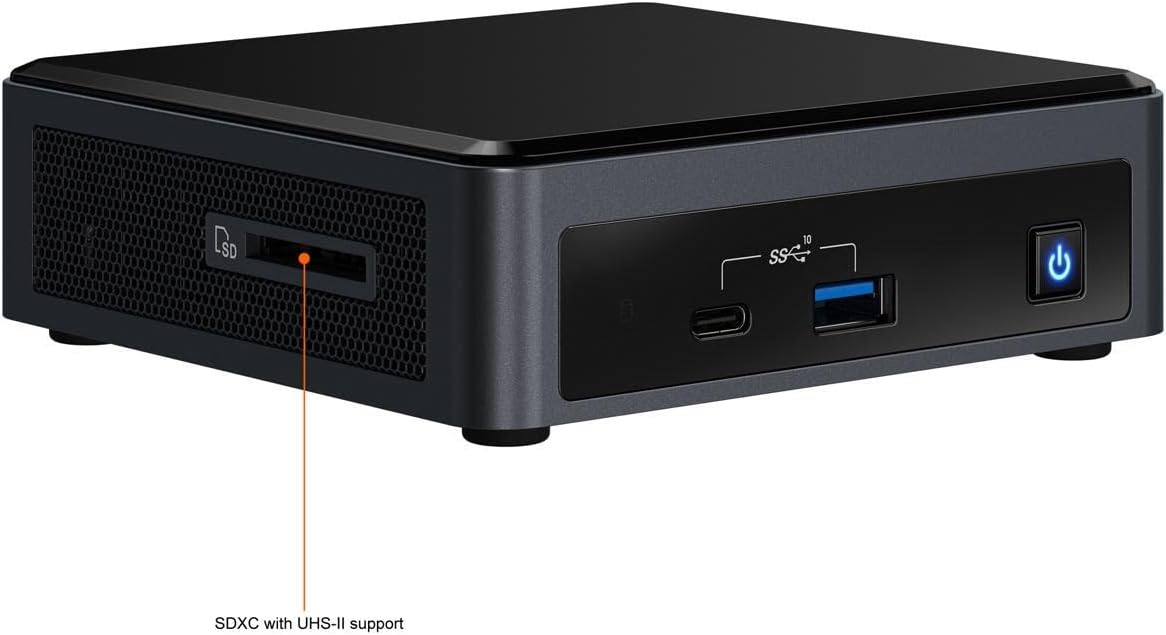
Նկար 5: Կողք view of the Intel NUC 10, highlighting the SDXC card slot with UHS-II support. This slot provides convenient access for reading and writing data from SD cards.
4.3. BIOS/UEFI կարգավորումներ
BIOS/UEFI կարգավորումներին մուտք գործելու համար սեղմեք F2 key repeatedly during startup. This allows configuration of boot order, system settings, and advanced features.
5. Պահպանում
Proper maintenance ensures the longevity and optimal performance of your NUC.
5.1. Մաքրում
- Keep the NUC in a clean, dust-free environment.
- Periodically clean the exterior with a soft, dry cloth.
- Use compressed air to gently clear dust from ventilation openings to maintain proper airflow and cooling. Ensure the system is powered off before cleaning.
5.2. Ծրագրային ապահովման թարմացումներ
- Regularly update your operating system, drivers, and BIOS/UEFI firmware. Visit the official Intel support website for the latest drivers and firmware for your NUC model.
- Keeping software up-to-date improves system stability, security, and performance.
6: Անսարքություն
Այս բաժինը անդրադառնում է այն տարածված խնդիրներին, որոնց կարող եք հանդիպել։
6.1. Ոչ մի ուժ
- Ensure the power adapter is securely connected to both the NUC and a working electrical outlet.
- Verify the power cord is fully inserted into the power adapter.
- Test the electrical outlet with another device.
6.2. Էկրանի ելք չկա
- Check that the monitor is powered on and the video cable (HDMI) is securely connected to both the NUC and the monitor.
- Համոզվեք, որ մոնիտորը կարգավորված է ճիշտ մուտքային աղբյուրի վրա։
- If using multiple monitors, try connecting only one.
- Reseat the RAM modules to ensure they are properly installed.
6.3. Operating System Not Booting
- Verify that the storage drive (SSD/HDD) is correctly installed and detected in the BIOS/UEFI settings.
- Check the boot order in BIOS/UEFI to ensure the correct drive is selected as the primary boot device.
- If you recently installed a new OS, ensure the installation media was created correctly.
For further assistance, refer to the Intel support webկայք կամ կապվեք հաճախորդների աջակցության հետ:
7. Տեխնիկական պայմաններ
Key technical specifications for the Intel NUC 10 Performance NUC10i5FNKN:
| Առանձնահատկություն | Մանրամասն |
|---|---|
| Մոդելի համարը | NUC10i5FNKN |
| Պրոցեսոր | Intel Core i5-10210U (10th Gen, 2.5 GHz) |
| Գրաֆիկա | Intel UHD Graphics (ինտեգրված) |
| Էկրանի առավելագույն լուծում | 4096x2304 |
| RAM-ի տեսակը | DDR4 SDRAM (SO-DIMM slots) |
| Պահպանման ինտերֆեյս | SATA/600 (for 2.5" drives), M.2 (for SSDs) |
| USB պորտեր | 7 (including USB 3.1 Gen2 Type-A and Type-C) |
| Ethernet | Gigabit Ethernet |
| Չափեր (LxWxH) | 6 x 5 x 4 դյույմ |
| Քաշը | 2.55 ֆունտ |
| Operating System (Supported) | Windows 10 (և այլ համատեղելի օպերացիոն համակարգեր) |
8. Երաշխիք և աջակցություն
8.1. Ապրանքի երաշխիք
This Intel NUC product is covered by Intel's standard limited warranty. For specific terms, conditions, and duration of your warranty, please refer to the warranty information included with your purchase or visit the official Intel webկայք։ Պահպանեք ձեր գնման ապացույցը երաշխիքային պահանջների համար։
8.2. Տեխնիկական աջակցություն
For technical assistance, driver downloads, firmware updates, and additional documentation, please visit the official Intel Support webկայքը:
When contacting support, have your product model number (NUC10i5FNKN) and serial number ready.
Ask a question about this manual
Ask about setup, troubleshooting, compatibility, parts, safety, or missing instructions. Manuals+ will review the question and use this page’s manual context to help answer it.