1. Ներածություն
This manual provides essential instructions for the setup, operation, maintenance, and troubleshooting of your Shuttle XPC Slim DH610 Barebone PC. The DH610 is a compact and versatile barebone system designed to support Intel 12th and 13th Generation LGA1700 processors, offering robust performance for various applications including office, digital signage, and kiosks.
2. Անվտանգության տեղեկատվություն
Խնդրում ենք կարդալ և հետևել այս անվտանգության ուղեցույցներին՝ սարքի վնասը կամ ինքներդ ձեզ վնասվածք պատճառելը կանխելու համար.
- Always disconnect the power cord before performing any installation or maintenance.
- Ensure the system is placed on a stable, flat surface with adequate ventilation.
- Մի՛ ենթարկեք սարքը խոնավության, ծայրահեղ ջերմաստիճանների կամ ուղղակի արևի լույսի ազդեցությանը։
- Only use the power adapter provided or an approved equivalent.
- Այս ձեռնարկում չնշված ցանկացած վերանորոգման համար դիմեք որակավորված սպասարկման անձնակազմին։
3. Փաթեթի բովանդակությունը
Ստուգեք, որ բոլոր իրերը առկա են ձեր փաթեթում.
- Shuttle XPC Slim DH610 Barebone PC Unit
- VESA Mount Kit
- Էլեկտրաէներգիայի ադապտեր և լար
- Accessory Pack (screws, cables, etc.)
- Արագ մեկնարկի ուղեցույց (եթե ներառված է)
4. Կարգավորում և տեղադրում
The Shuttle DH610 is a barebone system, requiring the installation of a CPU, RAM, and storage devices before operation.
4.1. Opening the Chassis
Carefully remove the chassis cover to access the internal components. Typically, this involves unscrewing a few screws on the rear or sides of the unit and sliding the cover off.

Image: The Shuttle XPC Slim DH610 with its top cover removed, showing the internal layout including cooling fans and the motherboard.
4.2. CPU տեղադրում
The DH610 supports Intel 12th/13th Generation Alder Lake-S LGA1700 processors with a maximum TDP of 65W. Ensure your chosen CPU has integrated graphics, as the system does not support F-series processors without integrated graphics or K-series processors.
- Բացեք պրոցեսորի միակցիչի լծակը և հեռացրեք պաշտպանիչ կափարիչը։
- Carefully align the CPU with the socket, matching the triangular markers.
- Զգուշորեն տեղադրեք պրոցեսորը միակցիչի մեջ՝ առանց ուժ գործադրելու։
- Փակեք միակցիչի լծակը՝ պրոցեսորը ամրացնելու համար։
- Տեղադրեք պրոցեսորի սառեցուցիչը արտադրողի հրահանգների համաձայն։
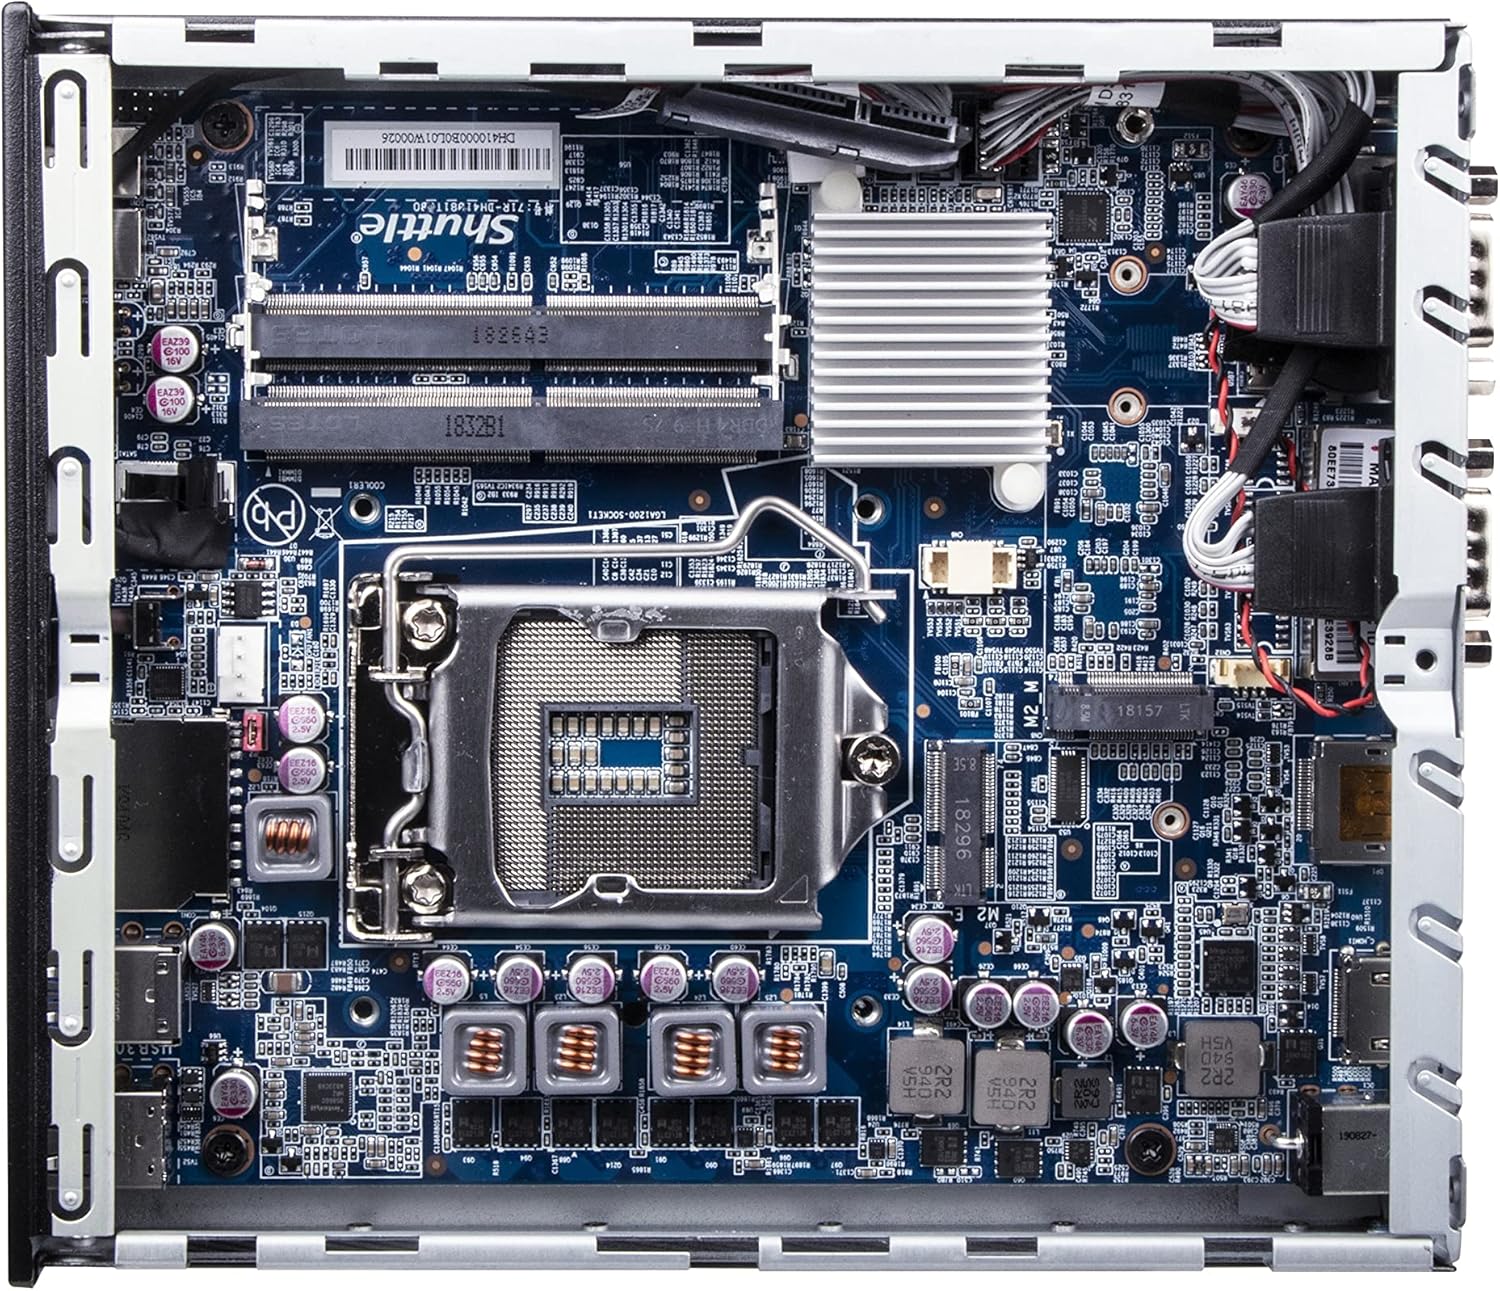
Պատկեր՝ մանրամասն view of the Shuttle DH610 motherboard, highlighting the LGA1700 CPU socket, RAM slots, and other integrated circuits.
Note: For 13th Gen Intel Processors, BIOS Version DH610000.202 or newer is required. Update BIOS if necessary after initial setup with a 12th Gen CPU or via a compatible method.
4.3. RAM-ի տեղադրում
The system features two 260-pin dual-channel DDR4 SODIMM slots, supporting up to 64GB (2x 32GB) at 3200MHz. Dual-channel memory is recommended for optimal performance.
- Locate the SODIMM slots on the motherboard.
- RAM մոդուլի վրայի կտրվածքը համապատասխանեցրեք անցքի մեջ գտնվող բանալու հետ։
- Insert the module at a 45-degree angle and push down until the clips on both sides snap into place.
4.4. Պահեստի տեղադրում
The DH610 supports one 2.5-inch HDD/SSD and one M.2 2280 SSD.
- 2.5" Drive: Mount the 2.5" HDD/SSD into the designated bay using the provided screws and connect the SATA data and power cables.
- M.2 SSD: Insert the M.2 2280 SSD into its slot, securing it with the provided screw.
4.5. Ծայրամասային սարքերի միացում
After installing internal components, reattach the chassis cover. Connect your peripherals to the available ports:
- Ցուցադրել: Connect your monitor(s) to the HDMI 2.0b port or one of the two DisplayPort outputs. The system supports up to three 4K UHD displays.
- USB սարքեր. Use the four USB 3.2 Gen1 ports (including one Type-C) and four USB 2.0 ports for keyboard, mouse, and other USB devices.
- Ցանց: Connect to your network using either of the two Gigabit Ethernet LAN ports (Intel 2.5GbE + Intel 1GbE).
- Serial Devices: Utilize the two RS232 COM ports for compatible devices.
- Աուդիո: Connect headphones or a microphone to the front audio jacks.

Image: The front panel of the Shuttle DH610, featuring the power button, USB 3.2 Gen1 ports (one Type-C), and audio input/output jacks.

Image: The rear panel of the Shuttle DH610, displaying the DC-IN power input, HDMI, two DisplayPort outputs, two LAN ports, USB ports, and two COM ports.
4.6. Էլեկտրաէներգիայի միացում
Connect the power adapter to the DC-IN port on the rear of the unit, then plug the power cord into an electrical outlet.
5. Գործառնական հրահանգներ
5.1. Միացում/անջատում
- Միացում՝ Սեղմեք հոսանքի կոճակը, որը գտնվում է առջևի վահանակի վրա:
- Անջատել: Perform a graceful shutdown through your operating system. Alternatively, press and hold the power button for 4-5 seconds for a forced shutdown (use only when necessary).
5.2. Օպերացիոն համակարգի տեղադրում
The DH610 is compatible with Windows 11/10 (64-bit) and Linux (64-bit) operating systems. Follow the standard installation procedures for your chosen OS. Ensure all necessary drivers are installed for optimal performance, which can typically be found on the Shuttle support webկայք։
5.3. BIOS/UEFI մուտք
BIOS/UEFI կարգավորման գործիքին մուտք գործելու համար սեղմեք Ջնջել or F2 key repeatedly during system startup. This allows configuration of boot options, system settings, and hardware parameters.
6. Պահպանում
6.1. Մաքրում
Regularly clean the exterior of the unit with a soft, dry cloth. Use compressed air to clear dust from ventilation openings to ensure proper airflow and prevent overheating. Do not use liquid cleaners directly on the device.
6.2. BIOS-ի թարմացումներ
Periodically check the Shuttle website for BIOS updates. BIOS updates can improve system stability, add support for new hardware (like 13th Gen Intel CPUs), and fix bugs. Follow the instructions provided with the BIOS update package carefully.
7: Անսարքություն
If you encounter issues with your DH610, refer to the following common problems and solutions:
- Էկրանի ելք չկա։
- Ensure the monitor is powered on and correctly connected to the HDMI or DisplayPort.
- Verify that the CPU has integrated graphics and that the display cable is connected to the motherboard's video output, not a discrete graphics card (if applicable).
- Փորձեք այլ էկրանի մալուխ կամ մոնիտոր։
- Համակարգը չի միանում՝
- Check that the power adapter is securely connected to both the unit and the electrical outlet.
- Ensure the CPU and RAM are correctly installed and seated.
- Փորձեք հոսանքի վարդակից այլ սարքով:
- 13th Gen CPU Not Recognized:
- The system requires BIOS Version DH610000.202 or newer for 13th Gen Intel processors. If you have an older BIOS, you may need to install a 12th Gen CPU first to update the BIOS.
- Համակարգի գերտաքացում՝
- Ensure the chassis ventilation holes are not obstructed.
- Clean any dust accumulation from the internal fans and heatsinks.
- Ստուգեք, որ պրոցեսորի սառեցուցիչը ճիշտ տեղադրված է և լավ կապ ունի պրոցեսորի հետ։
8. Տեխնիկական պայմաններ
| Առանձնահատկություն | Հստակեցում |
|---|---|
| Բրենդ | Շաթլ |
| Մոդելի անվանումը | DH610 |
| CPU Socket | LGA 1700 |
| Աջակցվող պրոցեսորներ | Intel 12th/13th Gen Alder Lake-S (65W max, with integrated graphics) |
| Չիպսեթ | Intel H610 |
| RAM-ի տեսակը | DDR4 SODIMM (2x slots) |
| Առավելագույն RAM տարողունակություն | 64 ԳԲ (2x 32 ԳԲ) |
| Հիշողության արագություն | Մինչև 3200 ՄՀց |
| Գրաֆիկա | Integrated Intel UHD Graphics (CPU dependent) |
| Տեսանյութի ելք | 1x HDMI 2.0b, 2x DisplayPort (Supports triple 4K UHD displays) |
| Պահպանում | 1x 2.5" HDD/SSD bay, 1x M.2 2280 slot |
| USB պորտեր | 4x USB 3.2 Gen1 (1x Type-C), 4x USB 2.0 (Total 8) |
| LAN | 1x Intel 2.5GbE, 1x Intel 1GbE |
| Սերիական նավահանգիստներ | 2x RS232 (COM) |
| Օպերացիոն համակարգի համատեղելիություն | Windows 11/10 (64-bit), Linux (64-bit) |
| Էլեկտրաէներգիայի սպառում | 65 Watts (CPU) |
| Ներառված բաղադրիչներ | VESA լեռ |
9. Երաշխիք և աջակցություն
9.1. Արտադրողի երաշխիք
The Shuttle XPC Slim DH610 Barebone PC comes with a 3-Year Manufacturer's Warranty. This warranty covers defects in materials and workmanship under normal use. Please retain your proof of purchase for warranty claims.
9.2. Տեխնիկական աջակցություն
For technical assistance, driver downloads, BIOS updates, or further troubleshooting not covered in this manual, please visit the official Shuttle website or contact Shuttle customer support. Free lifetime technical support is typically provided by the manufacturer.
Լրացուցիչ տեղեկությունների համար այցելեք՝ www.shuttle.com