Yitouniu Yitouniu-EWTH16
EWeLink Wireless Remote TH16 Switch User Manual
Model: Yitouniu-EWTH16
1. Ապրանքը ավարտված էview
The Yitouniu EWeLink TH16 Smart Switch is a versatile device designed to integrate into your smart home system, enabling remote and automatic control of appliances. It features temperature monitoring capabilities, allowing connected devices to be turned on or off based on a preset temperature range. This module works in conjunction with the included waterproof DS18B20 temperature sensor to enhance your home's automation.
Key functionalities include real-time temperature monitoring, remote ON/OFF control, timing tasks, automatic mode based on temperature, manual control, smart scene triggering, and voice control compatibility with Amazon Alexa and Google Home.
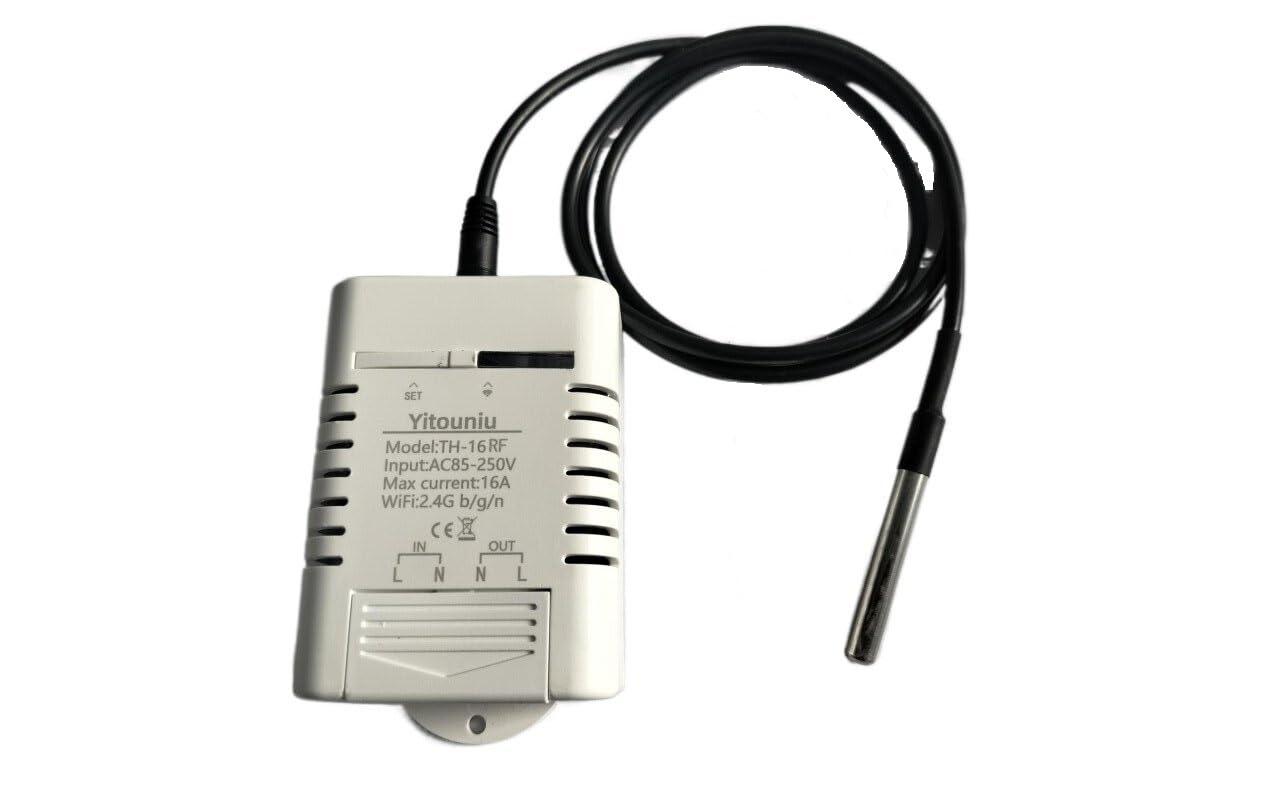
Նկար 1.1: EWeLink TH16 Smart Switch with connected DS18B20 temperature sensor.
2. Ի՞նչ կա տուփի մեջ
- 1 x TH-16 Smart Switch (Relay housing, relay module)
- 1 x DS18B20 Sensor (Temperature probe)
Note: The sensor can only detect temperature. For humidity detection, a separate humidity sensor is required.
3. Ապրանքի հատկությունները
- Լայն կիրառություն. Suitable for various uses including home brewing, fermentation, breeding, incubation, greenhouse temperature control, and more. Supports 85-250V, 16A MAX 3500W.
- Հավելվածի աջակցություն. Free eWeLink mobile application available for iOS and Android devices.
- Համաժամացման կարգավիճակ. Provides real-time device status and temperature monitoring directly to the eWeLink app. Temperature units (Celsius/Fahrenheit) are switchable.
- Հեռակառավարման միացում/անջատում. Control electrical devices from any location using the app, with high accuracy temperature readings from the waterproof DS18B20 sensor.
- Ձայնային կառավարում. Compatible with Amazon Alexa, Google Home, and Google Nest for convenient voice commands.
- Ժամանակի ֆունկցիաներ՝ Supports up to 8 enabled countdown, single, or repeat timing tasks to automate device operation at specified times.
- Ավտոմատ ռեժիմ. Configure the device to automatically turn on or off when the temperature falls within a specified range.
- Ձեռնարկի ռեժիմ. Allows for immediate manual control (ON/OFF) of the connected device.
- Խելացի տեսարանի ակտիվացուցիչ՝ Temperature values can be used as conditions to trigger other eWeLink smart devices.
- Համօգտագործման վերահսկում. Easily share control of your smart home devices with family members.
- Էներգիայի սպառման մոնիտորինգ. Monitor real-time energy consumption.
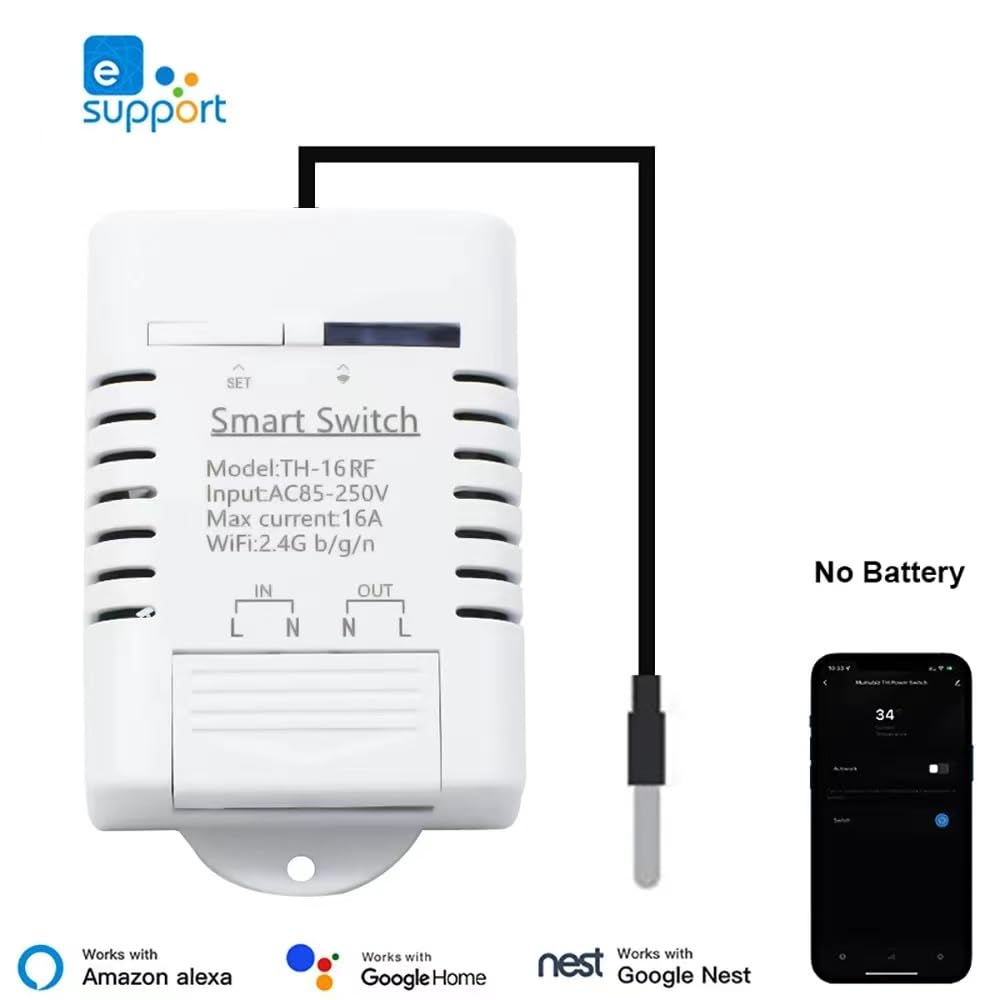
Նկար 3.1: The Smart Switch integrates with the eWeLink app and is compatible with Amazon Alexa, Google Home, and Google Nest.

Նկար 3.2: Examples of common usage scenarios for the TH16 Smart Switch.
4. Տեխնիկական պայմաններ
4.1. TH-16 Smart Switch
| Հատկանիշ | Արժեք |
|---|---|
| Մոդելի համարը | Yitouniu-EWTH16 |
| Ներածման ծավալըtage | AC85-250V |
| Max ընթացիկ | 16 Ա |
| Max Power | 3500 Վտ |
| Անլար ստանդարտ | WiFi 2.4GHz b/g/n |
| Ապրանքի չափերը | 2.79" երկարություն x 1.65" լայնություն (7.09 x 4.19 սմ) |
| Նյութ | Պլաստիկ |
| Գույն | Սպիտակ |
4.2. DS18B20 Sensor
| Հատկանիշ | Արժեք |
|---|---|
| Տեսակ | Ջրակայուն ջերմաստիճանի սենսոր |
| Զոնդ | Չժանգոտվող պողպատից ջերմաստիճանի զոնդ |
| Ջերմաստիճանի չափման միջակայք | -20°C ~ +100°C |
| Գործող Voltage | 3.0-5.5V |
| Երկարություն | 1m |
| Քաշը | 26 գ |

Նկար 4.1: Մանրամասն view of the waterproof DS18B20 temperature sensor.
5. Կարգավորում և տեղադրում
5.1. Wiring the Smart Switch
Before proceeding, ensure the main power supply to the circuit is turned OFF at the breaker to prevent electrical shock. The TH-16 Smart Switch requires a live (L) and neutral (N) input, and provides a switched live (L) and neutral (N) output to your appliance.
- Ճանաչեք ձեր սնուցման աղբյուրի ուղիղ (L) և չեզոք (N) լարերը։
- Connect the Live wire from the power source to the "IN L" terminal on the switch.
- Connect the Neutral wire from the power source to the "IN N" terminal on the switch.
- Connect the Live wire of your appliance to the "OUT L" terminal on the switch.
- Connect the Neutral wire of your appliance to the "OUT N" terminal on the switch.
- Plug the DS18B20 temperature sensor into the designated port on the smart switch.
- Secure all wire connections firmly.
Զգուշացում. Incorrect wiring can cause damage to the device or electrical hazards. If you are unsure, consult a qualified electrician.

Նկար 5.1: Wiring diagram for the TH-16 Smart Switch. Ensure correct Live (L) and Neutral (N) connections for both input and output.
5.2. App Pairing (eWeLink)
The smart switch operates on a 2.4GHz WiFi network. Ensure your mobile device is connected to a 2.4GHz WiFi network during the pairing process.
- Download the "eWeLink" app from the App Store (iOS) or Google Play Store (Android).
- Գրանցեք eWeLink հաշիվ և մուտք գործեք։
- Power on the TH-16 Smart Switch. The network indicator LED should be blinking rapidly (if not, press and hold the "SET" button for 5 seconds until it blinks rapidly to enter pairing mode).
- Open the eWeLink app, tap the "+" icon at the bottom center, and select "Quick Pairing Mode".
- Սարքը ձեր WiFi ցանցին միացնելու համար հետևեք էկրանի հրահանգներին:
- Once successfully paired, the device will appear in your eWeLink app, and the network indicator LED will become solid.
6. Գործառնական հրահանգներ
6.1. Remote Control and Status Monitoring
After successful pairing, you can remotely turn the connected appliance ON or OFF from anywhere using the eWeLink app, provided your phone has network access. The app also displays the real-time status of the switch and the current temperature from the DS18B20 sensor.
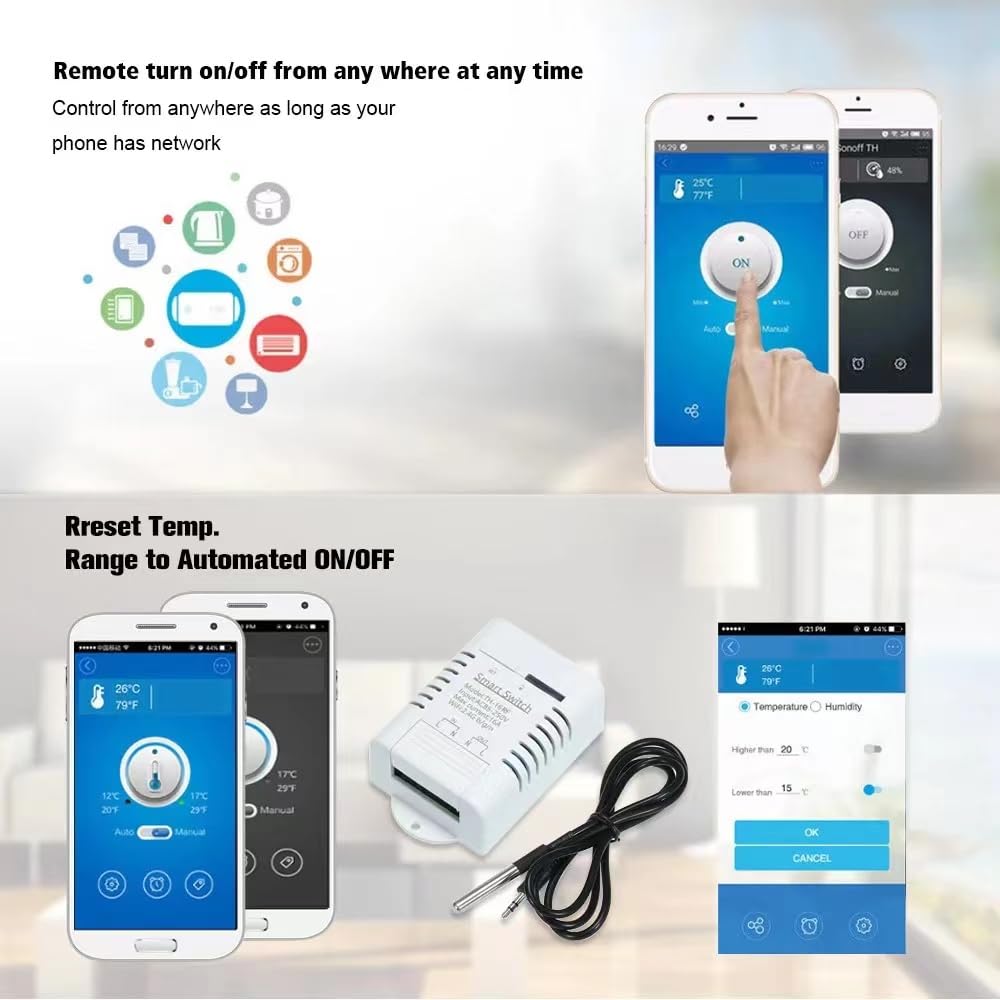
Նկար 6.1: Remote control and temperature range setting via the eWeLink app.
6.2. Auto Mode (Temperature Control)
Set the switch to automatically turn ON or OFF based on a specified temperature range:
- In the eWeLink app, select your TH-16 device.
- Navigate to the "Auto Mode" settings.
- Set the desired temperature range (e.g., turn ON when temperature is below X°C, turn OFF when temperature is above Y°C).
- Confirm your settings. The device will now operate autonomously based on the temperature readings.
6.3. Ձեռնարկի ռեժիմ
For immediate control, you can switch to "Manual Mode" in the eWeLink app or use the physical button on the device to toggle the power ON/OFF.
6.4. Ժամանակի ֆունկցիաներ
Schedule your devices to turn ON/OFF at specific times:
- In the eWeLink app, select your TH-16 device.
- Go to the "Timing" section.
- Դուք կարող եք սահմանել.
- Հետհաշվարկի ժամանակաչափեր՝ Turn ON/OFF after a set duration.
- Single Timers: Turn ON/OFF at a specific time on a specific date.
- Repeat Timers: Turn ON/OFF at specific times on selected days of the week.
- Save your timing tasks.
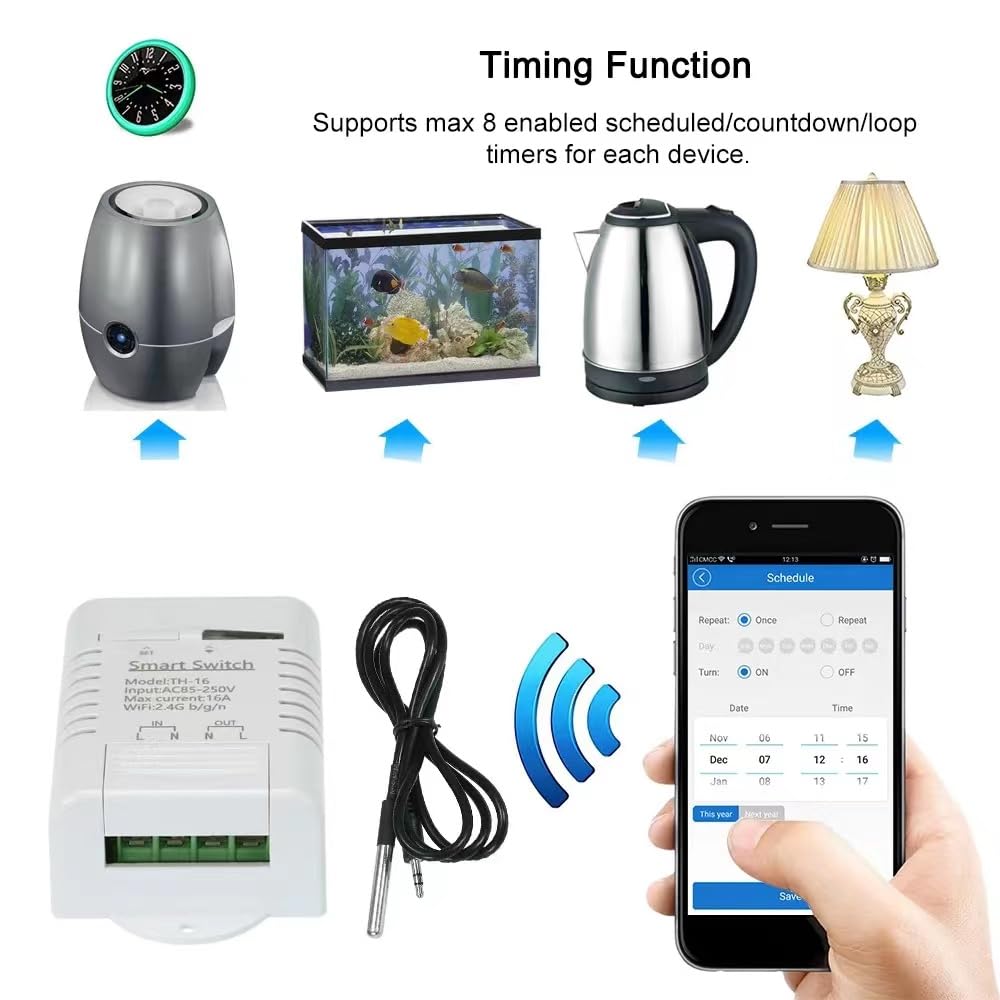
Նկար 6.2: Setting up timing schedules within the eWeLink app.
6.5. Ձայնային կառավարման ինտեգրում
To use voice commands with Amazon Alexa or Google Home:
- Ensure your TH-16 Smart Switch is successfully paired with the eWeLink app.
- Բացեք Amazon Alexa կամ Google Home հավելվածները։
- Միացրեք «eWeLink Smart Home» հմտությունը/ծառայությունը։
- Link your eWeLink account.
- Discover devices. Your TH-16 switch should now be controllable via voice commands (e.g., "Alexa, turn on the switch," "Hey Google, turn off the switch").
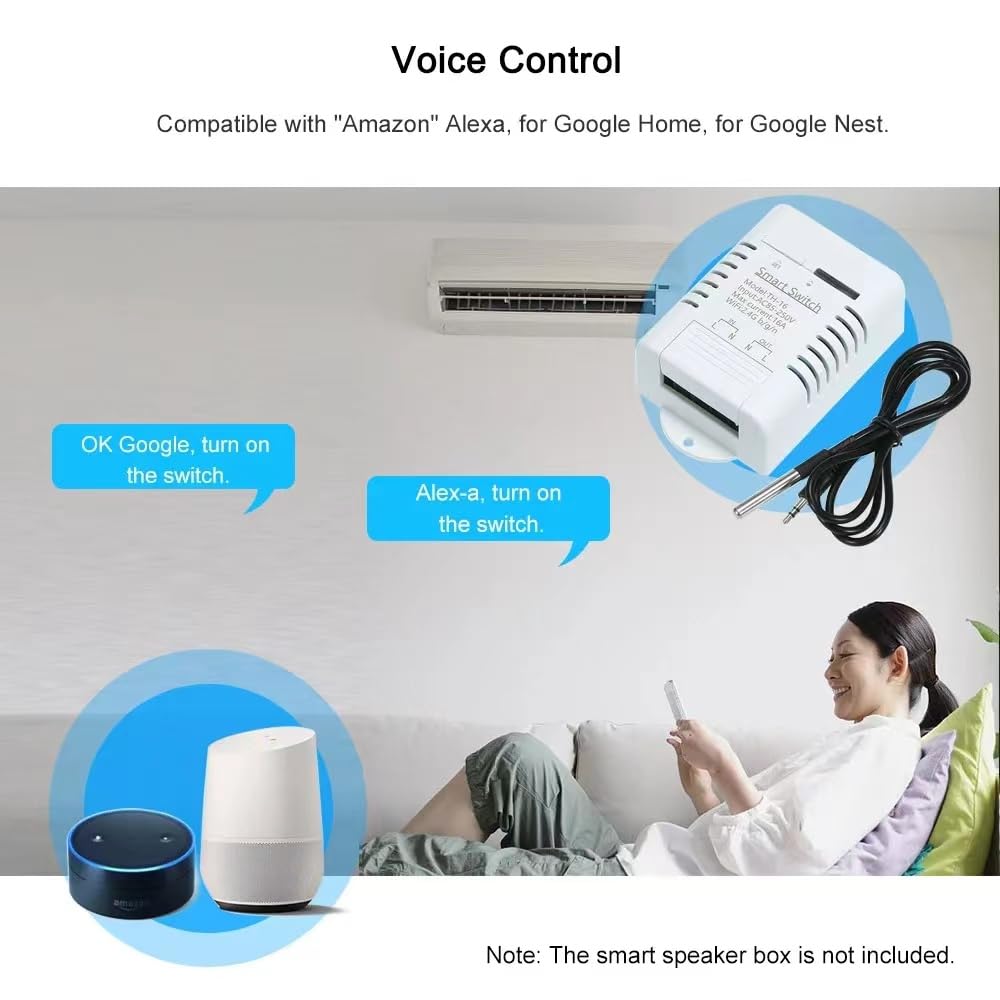
Նկար 6.3: Voice control compatibility with Amazon Alexa and Google Home.
6.6. Share Control
You can share control of your TH-16 Smart Switch with family members or other users:
- eWeLink հավելվածում ընտրեք այն սարքը, որը ցանկանում եք կիսվել։
- Tap on the "Share" icon or navigate to the sharing settings.
- Մուտքագրեք eWeLink հաշվի էլ․ հասցեն կամ հեռախոսահամարը այն անձի, ում հետ ցանկանում եք կիսվել։
- Set the permissions (e.g., control, view status, set timers).
- The invited user will receive a notification and can accept the shared control.

Նկար 6.4: Sharing device control with other eWeLink users.
7. Պահպանում
- Մաքրում: Սարքը սրբեք փափուկ, չոր կտորով։ Մի օգտագործեք հղկող մաքրող միջոցներ և մի ընկղմեք սարքը ջրի մեջ։
- Fրագրակազմի թարմացումներ. Regularly check the eWeLink app for available firmware updates to ensure optimal performance and security.
- Սենսորների խնամք. While the DS18B20 sensor is waterproof, avoid unnecessary exposure to harsh chemicals or extreme physical stress.
- Ցանցի կայունություն. Ensure your 2.4GHz WiFi network is stable and has good signal strength where the device is installed for reliable operation.
8: Անսարքություն
- Սարքը անցանց է հավելվածում՝
- Ստուգեք, արդյոք սարքը միացված է:
- Verify your WiFi router is working and the 2.4GHz network is active.
- Համոզվեք, որ սարքը գտնվում է ձեր WiFi ռաութերի հասանելիության սահմաններում։
- Try restarting the device and your router.
- If the issue persists, try re-pairing the device with the eWeLink app.
- Հնարավոր չէ զուգակցել սարքը՝
- Ensure your phone is connected to a 2.4GHz WiFi network (5GHz networks are not supported).
- Make sure the device is in pairing mode (network indicator blinking rapidly).
- Ստուգեք ձեր WiFi գաղտնաբառի ճշգրտությունը։
- Զուգավորման ընթացքում սարքը մոտեցրեք ռաութերին։
- Ձայնային կառավարումը չի աշխատում.
- Confirm the eWeLink skill/service is enabled and linked in your Alexa/Google Home app.
- Ensure your voice assistant device is online and connected to the same network.
- Try re-discovering devices in the Alexa/Google Home app.
- Սխալ ջերմաստիճանի ցուցմունքներ.
- Ensure the DS18B20 sensor is securely plugged into the switch.
- Check for any physical damage to the sensor cable or probe.
- Verify the sensor is placed in an appropriate location, away from direct heat sources or drafts that could skew readings.
9. Երաշխիք և աջակցություն
This product comes with a standard manufacturer's warranty. For specific warranty terms and conditions, please refer to the documentation provided at the time of purchase or contact the seller directly. For technical support, troubleshooting assistance, or inquiries regarding product functionality, please reach out to the manufacturer or your point of purchase.
Արտադրող: Յիտունիու
Առաջին հասանելի ամսաթիվը. 13 հուլիսի, 2023 թ