KERUI M523
KERUI Wireless Doorbell (Model M523) User Manual
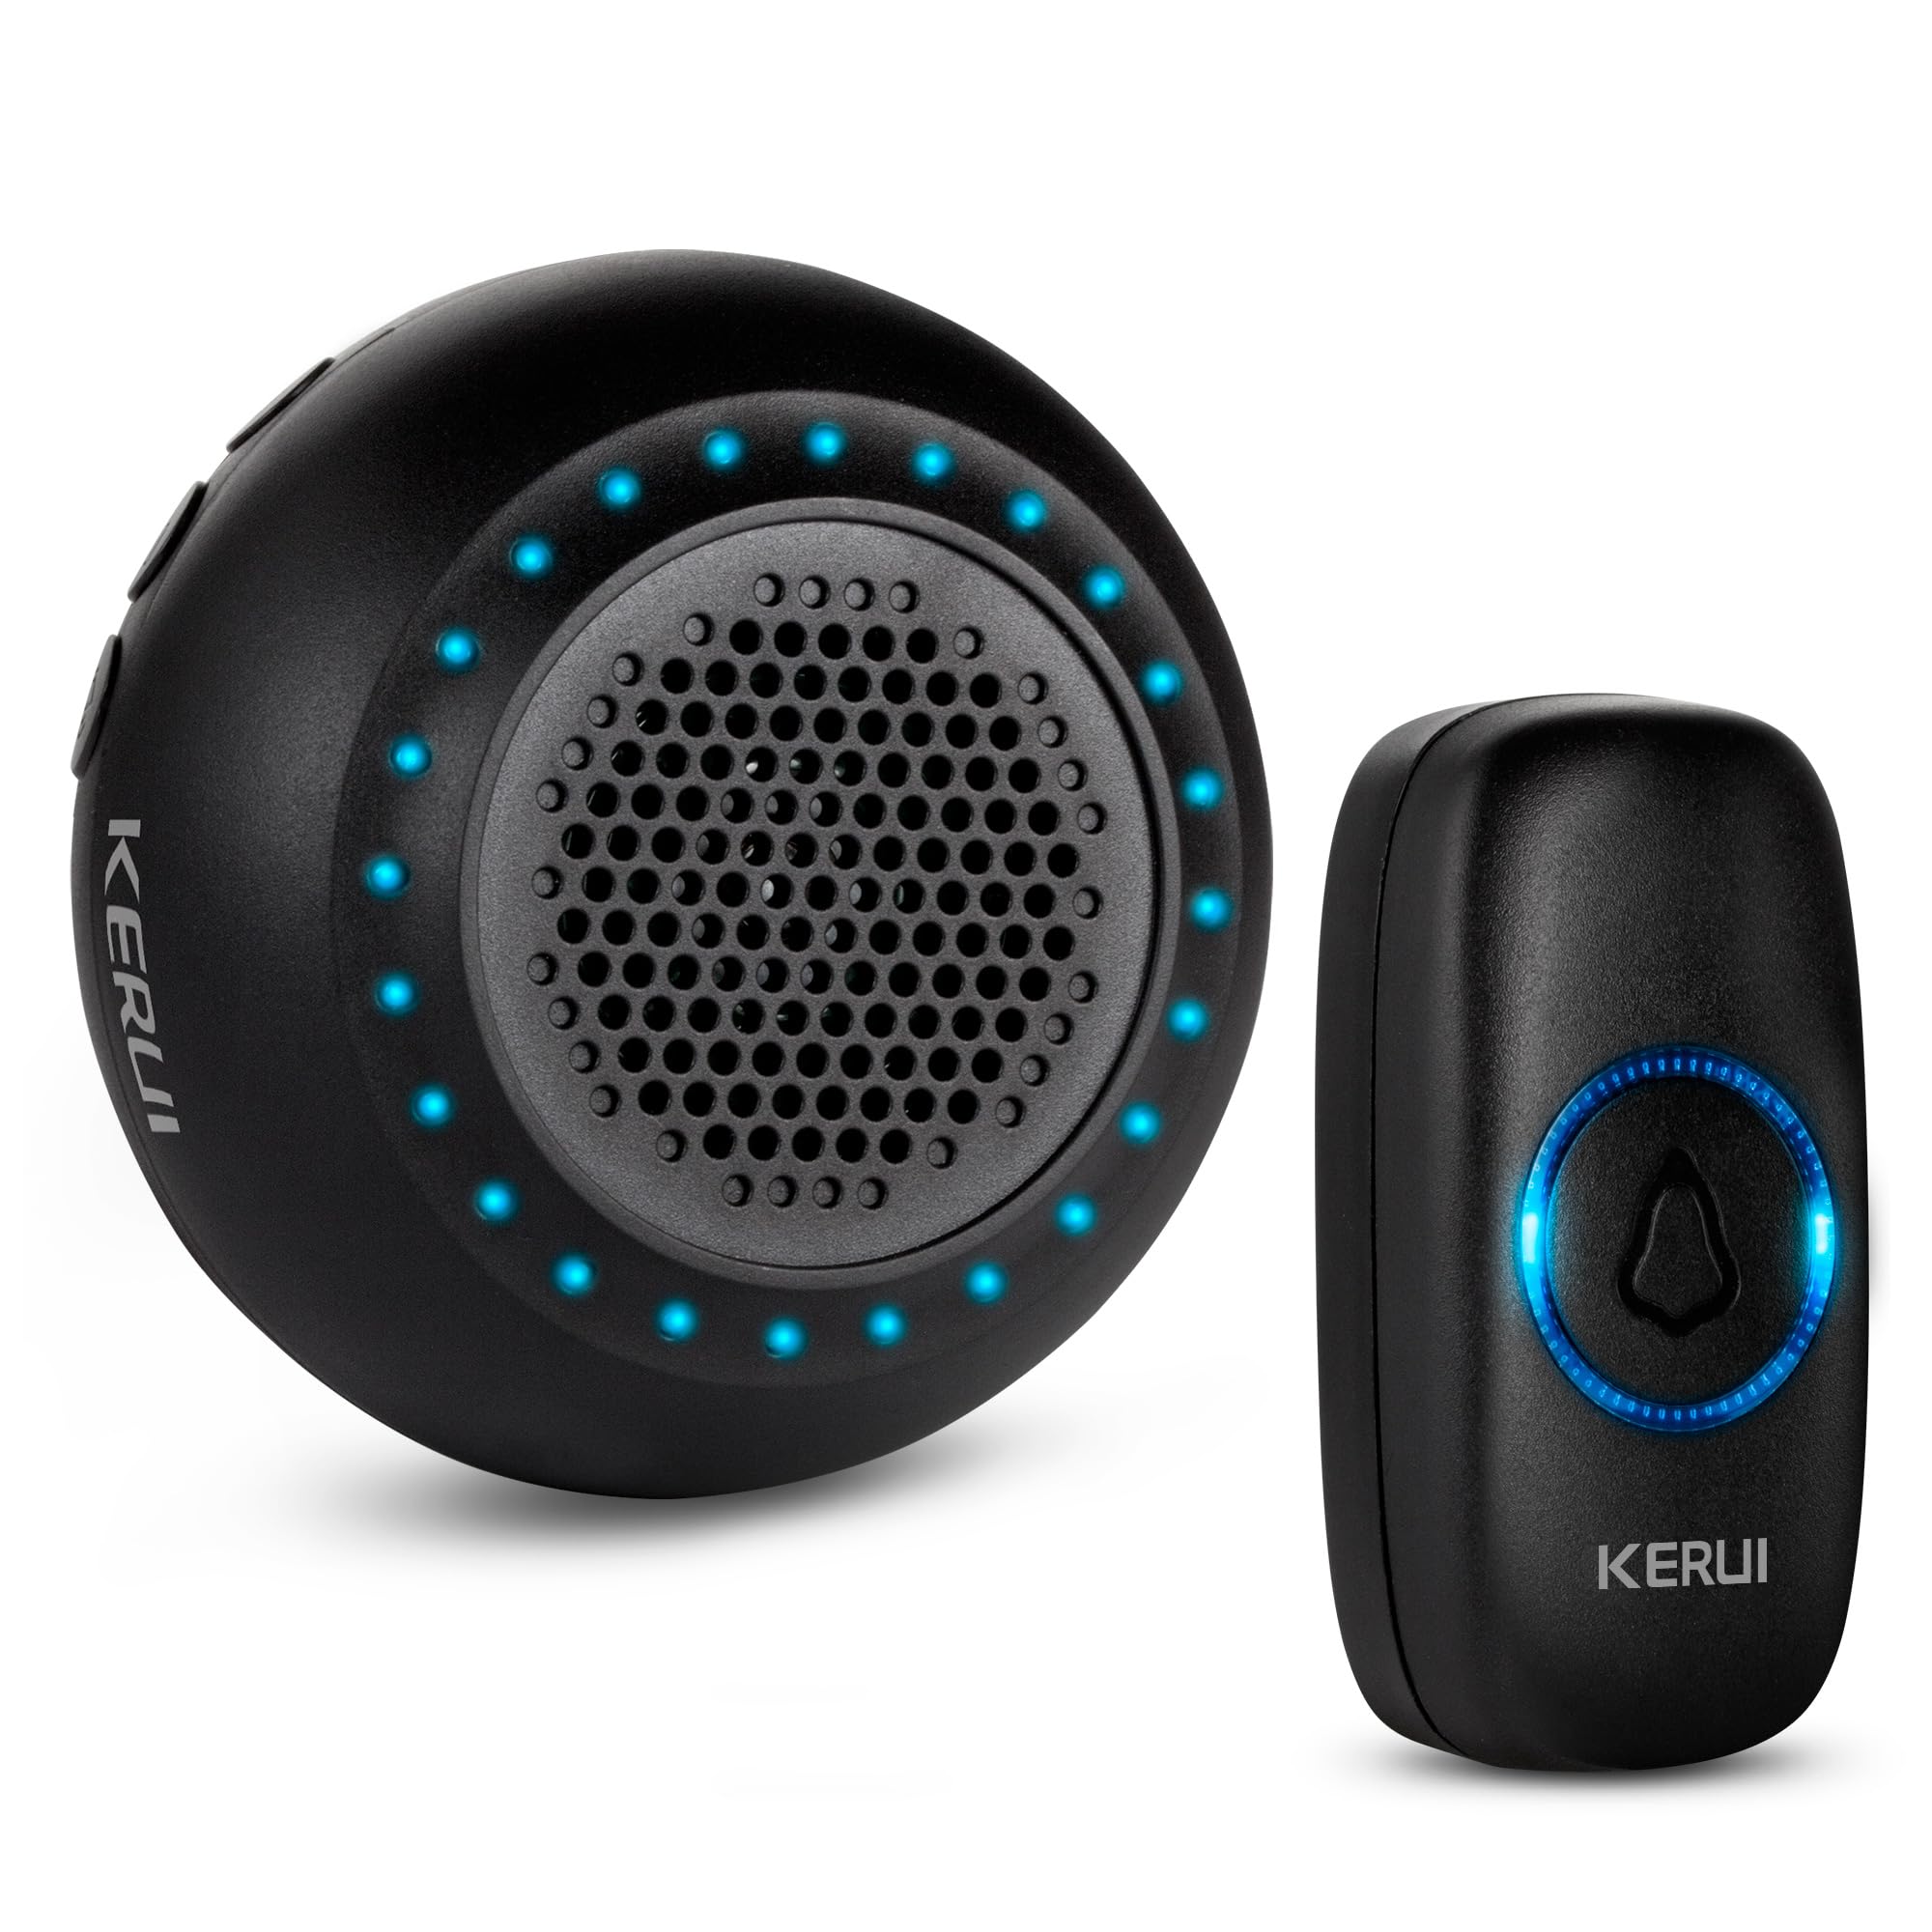
Model: M523 | Brand: KERUI
Ներածություն
Thank you for choosing the KERUI Wireless Doorbell. This system is designed to provide a reliable and convenient notification solution for your home or office. Featuring an IP55 waterproof push button, a plug-in receiver with 32 selectable chimes, 4 adjustable volume levels, and a long operating range, this doorbell ensures you never miss a visitor. Please read this manual carefully before installation and use to ensure optimal performance and longevity of your device.
Փաթեթի բովանդակությունը
Ստուգեք, որ բոլոր իրերը առկա են ձեր փաթեթում.
- 1 x Doorbell Receiver (Black)
- 1 x Push Button (Black)
- Mounting Accessories for Push Button (screws, anchors, adhesive tape)
- 1 x Օգտագործողի ձեռնարկ
Ապրանքը ավարտվել էview
Familiarize yourself with the components and features of your KERUI Wireless Doorbell system.
Video 1: KERUI Wireless Doorbell Product Overview. Այս տեսանյութը ընդհանուր պատկերացում է տալիսview of the KERUI wireless doorbell, showcasing its features and components.


Կարգավորման հրահանգներ
1. Push Button Installation
The push button can be installed using either the provided adhesive tape or screws.
- Choose a suitable location for the push button, typically near your door.
- Կպչուն ժապավենի օգտագործումը. Clean the surface thoroughly. Peel off one side of the double-sided adhesive tape and stick it to the back of the push button. Peel off the other side and firmly press the button onto the desired surface for 30 seconds.
- Օգտագործելով պտուտակներ. Open the back cover of the push button (refer to the Maintenance section for battery replacement for guidance on opening). Mark the screw holes on the wall. Drill pilot holes if necessary and insert the wall anchors. Secure the back cover to the wall with the screws, then reattach the front part of the push button.

2. Ընդունիչի կարգավորում
Plug the doorbell receiver into any standard electrical outlet within range of the push button. The receiver will light up and emit a default chime.

3. Սարքերի զուգակցումը
Your doorbell kit is pre-paired at the factory. If re-pairing is needed or you add new push buttons, follow these steps:
- Միացրեք ընդունիչը հոսանքի վարդակից:
- Երկար սեղմեք Կարգավորման կոճակ (gear icon) on the receiver for approximately 5 seconds until the LED indicators flash and the receiver beeps once. This indicates it has entered pairing mode.
- Within 8 seconds, short press the push button. The receiver will emit two "Ding" sounds and the LED light will flash, confirming successful pairing.
- Կարճ սեղմեք Կարգավորման կոճակ again to exit pairing mode. The LED indicators will turn off.
Video 2: KERUI Wireless Doorbell Pairing Operation. This video demonstrates the step-by-step process of pairing the push button with the receiver.
Video 3: How to Pair the Doorbell. A visual guide on how to successfully pair your doorbell components.
Գործառնական հրահանգներ
1. Changing the Ringtone
The receiver offers 32 different melodies. To select a ringtone:
- Սեղմեք Music Select Button (musical note icon) on the receiver to cycle through the available melodies.
- Once you hear a melody you like, stop pressing the button. The selected melody will be saved automatically.
- If you wish to assign a specific ringtone to a particular push button, enter pairing mode (as described in the Setup section), select your desired ringtone, then press the push button to confirm.
Video 4: How to Change Ringtone and Re-pair Doorbell. This video illustrates how to change the ringtone and re-pair the doorbell if needed.
Video 5: How to Choose Your Favorite Ringtone. A visual guide on selecting and setting your preferred ringtone.
2. Ձայնի կարգավորում
The receiver has 4 adjustable volume levels, including a mute mode. Press the Ձայնի վերահսկման կոճակ (speaker icon) on the receiver repeatedly to cycle through the volume levels until you reach your desired setting.
3. Անջատման ռեժիմ
To activate mute mode, press the Ձայնի վերահսկման կոճակ until the volume is set to the lowest level or the mute indicator is shown (if applicable). In mute mode, the receiver's LED flash will still activate when the push button is pressed, providing a visual alert without sound.
Տեխնիկական սպասարկում
1. Push Button Battery Replacement
The push button is powered by a CR2032 Lithium Ion battery (included). When the button's LED indicator no longer lights up or the signal range decreases significantly, it's time to replace the battery.
- Carefully pry open the back cover of the push button using a small flat-head screwdriver or the provided tool, inserting it into the notch at the bottom.
- Հեռացրեք հին CR2032 մարտկոցը:
- Տեղադրեք նոր CR2032 մարտկոց՝ համոզվելով, որ դրական (+) կողմը դեպի վերև է ուղղված։
- Snap the back cover firmly back into place.
Video 6: How to Replace the Battery. This video provides a visual guide on replacing the battery in the push button transmitter.
Նշում. Հեռացրեք հին մարտկոցները պատասխանատու կերպով՝ համաձայն տեղական կանոնակարգերի:
Անսարքությունների վերացում
| Խնդիր | Հնարավոր պատճառ | Լուծում |
|---|---|---|
| Doorbell does not ring. |
|
|
| Կարճ գործողության միջակայք։ |
|
|
| Receiver rings randomly. |
|
|
Տեխնիկական պայմաններ
- Ապրանքանիշը: ԿԵՐՈՒԻ
- Մոդելի համարը: M523
- Նյութի Քաշը: 3.52 ունցիա
- Ապրանքի չափսերը. 4 x 3 x 3 դյույմ
- Հպման կոճակի մարտկոց. 1 x Lithium Ion (CR2032)
- Անջրանցիկ վարկանիշ. IP55 (Push Button)
- Գործառնական միջակայք. Up to 1000ft (in open area)
- Զանգեր: 32 ընտրովի մեղեդի
- Ծավալի մակարդակներ. 4 adjustable levels (including mute)
- Ներառված բաղադրիչներ. 1 Doorbell Receiver, 1 Push Button
Երաշխիք և աջակցություն
For warranty information or technical support, please refer to the contact details provided with your product packaging or visit the official KERUI webկայք։ Պահպանեք ձեր գնման կտրոնը որպես գնման ապացույց։
Առնչվող փաստաթղթեր - M523
 |
Wireless Doorbell Kit Instruction Manual M5375+F152 Instruction manual for the M5375+F152 Wireless Doorbell Kit, covering safety, installation, setup, operation, and troubleshooting. Learn how to install and use your new wireless doorbell. |
 |
KERUI M116-2E անլար ինֆրակարմիր կենդանիների նկատմամբ իմունիտետի դետեկտորի օգտագործողի ձեռնարկ KERUI M116-2E անլար ինֆրակարմիր կենդանիների նկատմամբ իմունիտետի դետեկտորի օգտագործողի ձեռնարկ: Հատկանիշներից են կենդանիների նկատմամբ իմունիտետը, կարգավորվող հայտնաբերման հեռավորությունը, ռադիոհաճախականության տագնապի ազդանշանը և հեշտ տեղադրումը: Իմացեք տեղադրման, շահագործման և տեխնիկական բնութագրերի մասին: |
 |
KERUI M7 Split Welcome Alarm-ի օգտագործողի ձեռնարկ KERUI M7 Split Welcome Alarm համակարգի օգտագործողի ձեռնարկը, որը մանրամասն նկարագրում է դրա առանձնահատկությունները, կարգավորումը, գործառույթները և տեխնիկական բնութագրերը: Այս անլար ահազանգման համակարգը առաջարկում է ողջույնի, գողության դեմ պաշտպանության, դռան զանգի և գիշերային լույսի ռեժիմներ՝ 32 երգի ընտրանքներով: |
 |
KERUI M520 F55 օգտագործողի ձեռնարկը վերևում էview և FCC հայտարարությունը Մի ավարտview KERUI M520 F55-ի օգտագործողի ձեռնարկի, որը ներառում է չինարեն հրահանգներ և դիագրամներ, ինչպես նաև FCC համապատասխանության մասին անգլերեն լեզվով ամբողջական հայտարարություն: |
 |
KERUI M5 ինֆրակարմիր հայտնաբերման ողջույնի ազդանշանի օգտագործողի ձեռնարկ KERUI M5 ինֆրակարմիր հայտնաբերման ողջույնի ազդանշանի օգտագործողի ձեռնարկ: Իմացեք դրա առանձնահատկությունների, տեղադրման, շահագործման և տան, խանութի և գրասենյակի անվտանգության տեխնիկական բնութագրերի մասին: |
 |
KERUI DW520 Motion Sensor Alarm User Manual Detailed user manual for the KERUI DW520 Motion Sensor Alarm system, covering product introduction, features, setup, pairing, installation, and technical specifications. Includes FCC compliance information. |