
1. Ներածություն
This manual provides instructions for the safe operation, maintenance, and troubleshooting of your FLEX 24V Brushless Cordless 1/2-Inch Hammer Drill Turbo Mode Kit, model FX1271T-2B. Please read this manual thoroughly before using the tool to ensure proper and safe operation.
The FLEX FX1271T-2B is a powerful 24V brushless cordless hammer drill designed for demanding drilling and driving applications. It features a 1/2-inch full-metal ratcheting chuck, two-speed settings, a Turbo Mode for increased speed, and an anti-kickback safety feature. This kit includes the drill, a 2.5Ah Lithium-Ion Battery, a 5.0Ah Lithium-Ion Battery, and a 160W Fast Charger.
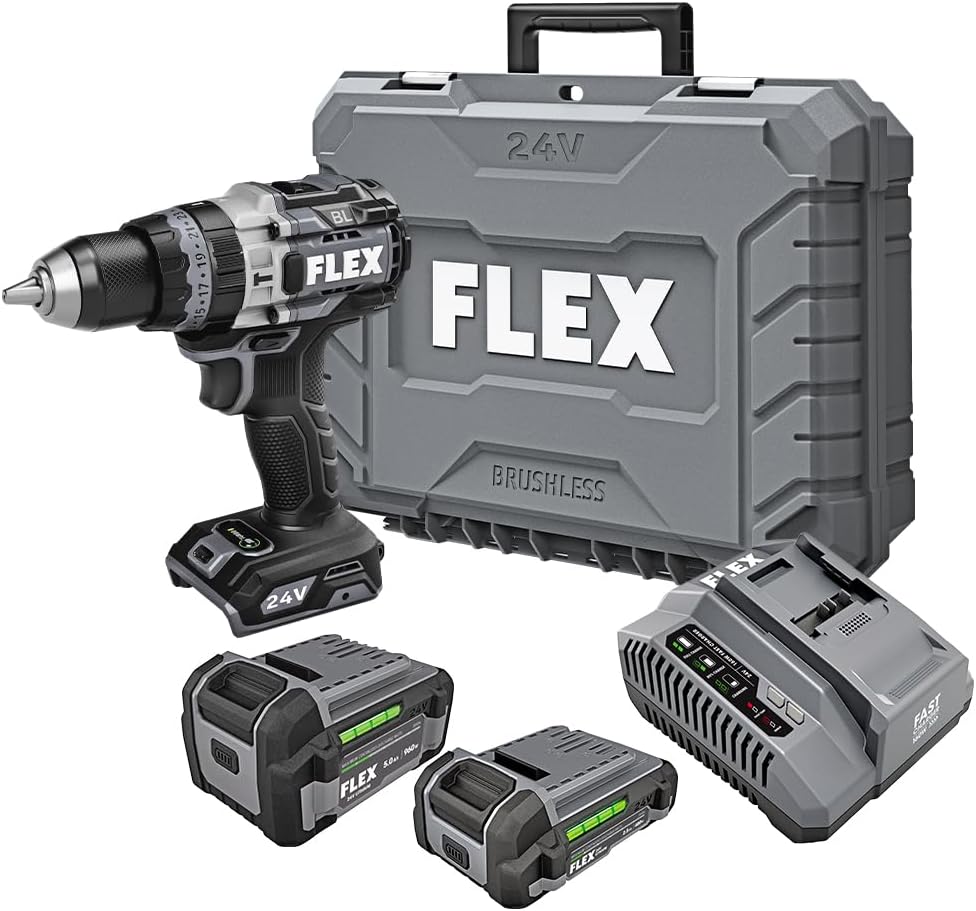
Figure 1: FLEX 24V Brushless Cordless 1/2-Inch Hammer Drill Kit (FX1271T-2B) including drill, two batteries, charger, and carrying case.
2. Ընդհանուր անվտանգության հրահանգներ
ԶԳՈՒՇԱՑՈՒՄ. Կարդացեք անվտանգության բոլոր նախազգուշացումները, հրահանգները, նկարազարդումները և բնութագրերը, որոնք տրամադրվում են այս էլեկտրական գործիքին: Ստորև թվարկված բոլոր հրահանգներին չհետևելը կարող է հանգեցնել էլեկտրական ցնցումների, հրդեհի և/կամ լուրջ վնասվածքների:
2.1 Աշխատանքային տարածքի անվտանգություն
- Պահպանեք աշխատանքային տարածքը մաքուր և լավ լուսավորված: Խառնաշփոթ կամ մութ տարածքները վթարներ են առաջացնում:
- Մի աշխատեք էլեկտրական գործիքները պայթուցիկ մթնոլորտում, օրինակ՝ դյուրավառ հեղուկների, գազերի կամ փոշու առկայության դեպքում: Էլեկտրական գործիքները կայծեր են ստեղծում, որոնք կարող են բոցավառել փոշին կամ գոլորշին:
- Էլեկտրական գործիքի հետ աշխատելիս երեխաներին և անցորդներին հեռու պահեք: Շեղումները կարող են հանգեցնել ձեր վերահսկողության կորստի:
2.2 Էլեկտրական անվտանգություն
- Էլեկտրական գործիքների մոմերը պետք է համապատասխանեն վարդակից: Երբեք ոչ մի կերպ մի փոփոխեք խրոցը: Մի օգտագործեք ադապտերների խրոցակները հողակցված (հիմնավորված) էլեկտրական գործիքների հետ: Չփոփոխված վարդակները և համապատասխան վարդակները կնվազեցնեն էլեկտրական ցնցումների վտանգը:
- Խուսափեք մարմնի շփումից հողակցված կամ հողակցված մակերեսների հետ, ինչպիսիք են խողովակները, ռադիատորները, միջակայքերը և սառնարանները: Էլեկտրական ցնցումների մեծ ռիսկ կա, եթե ձեր մարմինը հողակցված է կամ հիմնավորված:
- Էլեկտրական գործիքները մի դրեք անձրևի կամ խոնավության տակ: Էլեկտրական գործիք մտնելու ջուրը կբարձրացնի էլեկտրական ցնցումների վտանգը:
2.3 Անձնական անվտանգություն
- Միշտ կրեք աչքերի պաշտպանիչ միջոցներ։ Օգտագործեք պաշտպանիչ ակնոցներ, պաշտպանիչ ակնոցներ կամ դեմքի վահան։
- Գործիքը երկար ժամանակ օգտագործելիս կրեք լսողական պաշտպանիչներ։
- Ճիշտ հագնվեք։ Մի հագեք լայն հագուստ կամ զարդեր: Ձեր մազերը և հագուստը հեռու պահեք շարժվող մասերից:
- Եղեք զգոն, հետևեք, թե ինչ եք անում և օգտագործեք ողջախոհությունը էլեկտրական գործիքը գործարկելիս:
2.4 Գործիքների օգտագործում և խնամք
- Մի ստիպեք էլեկտրական գործիքին: Օգտագործեք ճիշտ էլեկտրական գործիքը ձեր հավելվածի համար:
- Անջատեք մարտկոցի փաթեթը էլեկտրական գործիքից՝ նախքան որևէ ճշգրտում կատարելը, աքսեսուարները փոխելը կամ էլեկտրական գործիքները պահելը:
- Պահպանեք անգործուն էլեկտրական գործիքները երեխաների համար անհասանելի վայրում և թույլ մի տվեք, որ էլեկտրական գործիքը կամ սույն հրահանգները անծանոթ մարդիկ աշխատեն էլեկտրական գործիքը:
- Պահպանեք էլեկտրական գործիքները և պարագաները: Ստուգեք շարժվող մասերի անհամապատասխանությունը կամ կապակցումը, մասերի կոտրվածությունը և ցանկացած այլ պայման, որը կարող է ազդել էլեկտրական գործիքի աշխատանքի վրա:
2.5 Մարտկոցի գործիքի օգտագործում և խնամք
- Լիցքավորեք միայն արտադրողի կողմից նշված լիցքավորիչով: Լիցքավորիչը, որը հարմար է մեկ տեսակի մարտկոցի փաթեթի համար, կարող է հրդեհի վտանգ ստեղծել, երբ օգտագործվում է մեկ այլ մարտկոցի փաթեթի հետ:
- Օգտագործեք էլեկտրական գործիքներ միայն հատուկ նշանակված մարտկոցներով: Մարտկոցների ցանկացած այլ տուփի օգտագործումը կարող է առաջացնել վնասվածքների և հրդեհի վտանգ:
- Երբ մարտկոցի փաթեթը չի օգտագործվում, այն հեռու պահեք այլ մետաղական առարկաներից, ինչպիսիք են թղթի սեղմակները, մետաղադրամները, բանալիները, մեխերը, պտուտակները կամ այլ փոքր մետաղական առարկաներ, որոնք կարող են միացնել մի տերմինալից մյուսը: Մարտկոցի տերմինալների կարճացումը կարող է առաջացնել այրվածքներ կամ հրդեհ:
- Չարաշահման պայմաններում մարտկոցից հեղուկը կարող է արտանետվել. խուսափել շփումից. Եթե պատահաբար շփում է տեղի ունենում, լվացեք ջրով: Եթե հեղուկը շփվում է աչքերի հետ, լրացուցիչ դիմեք բժշկի օգնությանը: Մարտկոցից դուրս եկող հեղուկը կարող է առաջացնել գրգռվածություն կամ այրվածքներ:
3. Ներառված բաղադրիչները
Your FLEX 24V Brushless Cordless 1/2-Inch Hammer Drill Kit (FX1271T-2B) includes the following items:
- FLEX 24V Brushless Cordless 1/2-Inch Hammer Drill
- (1) FLEX 24V 2.5Ah Lithium-Ion Battery (FX0111-1)
- (1) FLEX 24V 5.0Ah Lithium-Ion Battery (FX0121-1)
- FLEX 160W արագ լիցքավորիչ
- Օժանդակ բռնակ
- Փոխադրման պատյան

Figure 2: The FLEX Advantage highlights the included 2.5Ah and 5.0Ah Lithium-Ion batteries, emphasizing their power, runtime, and fast charging capabilities.
4. Կարգավորում և սկզբնական օգտագործում
4.1 Մարտկոցի լիցքավորում
- Միացրեք 160 Վտ արագ լիցքավորիչը ստանդարտ վարդակիցին։
- Սահեցրեք մարտկոցի փաթեթը լիցքավորիչի վրա, մինչև այն իր տեղում ամրանա։
- The charger's indicator lights will show the charging status. A fully charged battery will be indicated by a solid green light.
- Լրիվ լիցքավորվելուց հետո հեռացրեք մարտկոցը լիցքավորիչից:
4.2 Մարտկոցի տեղադրում
- Align the battery pack with the battery port on the base of the drill handle.
- Սահեցրեք մարտկոցը միացման անցքի մեջ, մինչև այն ամուր ամրանա իր տեղում։ Համոզվեք, որ այն լիովին տեղադրված է՝ շահագործման ընթացքում պատահական տեղաշարժից խուսափելու համար։
- To remove the battery, press the release button(s) on the sides of the battery pack and slide it out.
4.3 Օժանդակ բռնակի ամրացումը
For improved control and safety, especially during high-torque applications or hammer drilling, attach the auxiliary handle.
- Թուլացրեք օժանդակ բռնակըamp պտտելով այն ժամացույցի սլաքի հակառակ ուղղությամբ։
- Slide the handle over the front of the drill body, positioning it to your preferred angle.
- Խստացրեք clamp պտտելով այն ժամացույցի սլաքի ուղղությամբ, մինչև բռնակը ամուր ամրացվի։

Figure 3: The drill with the auxiliary handle attached, providing enhanced control and stability, particularly when the anti-kickback feature engages.
4.4 Հորատման գլխիկների կամ պարագաների տեղադրում
- Ensure the drill is off and the battery is removed for safety.
- Grip the rear collar of the 1/2-inch full-metal ratcheting chuck and rotate the front collar counter-clockwise to open the chuck jaws.
- Insert the drill bit or accessory fully into the chuck jaws.
- Rotate the front collar clockwise to tighten the chuck jaws firmly around the bit. The ratcheting mechanism will provide an audible click when securely tightened.
- Gently pull on the bit to ensure it is properly secured.

Figure 4: Detail of the 1/2-inch full-metal ratcheting chuck, designed for secure bit retention and durability.
5. Գործառնական հրահանգներ
5.1 Միացում/անջատում և արագության կառավարում
- Գործարկիչի անջատիչ. Squeeze the trigger switch to turn the drill on. Release it to turn the drill off.
- Փոփոխական արագություն. The trigger switch is pressure-sensitive, allowing for variable speed control. Pressing the trigger further increases the speed.
- Առաջ/Հետ ընտրիչ՝ Located above the trigger, push the selector left for forward rotation (drilling/driving) and right for reverse rotation (removing screws). Center position locks the trigger for safety.
5.2 Gear Selection (2-Speed)
The drill features a 2-speed gearbox for optimal performance across various applications.
- Փոխանցման տուփ 1 (ցածր արագություն, բարձր պտտող մոմենտ): Slide the gear selector switch to position '1'. Ideal for driving screws, drilling large holes, or applications requiring maximum torque.
- 2-րդ փոխանցում (բարձր արագություն, ցածր պտտող մոմենտ): Slide the gear selector switch to position '2'. Suitable for fast drilling of smaller holes in wood or metal.
NOTE: Always ensure the drill is stopped before changing gear settings to prevent damage to the gearbox.
5.3 Mode Selection (Drill, Drive, Hammer Drill)
Rotate the collar behind the chuck to select the desired operating mode:
- Հորատման ռեժիմ (Հորատման պատկերակ): For drilling holes in wood, metal, and plastics.
- Drive Mode (Screw Icon): For driving screws. The clutch settings (numbered ring) allow you to adjust the torque to prevent over-driving screws or damaging materials.
- Մուրճով հորատման ռեժիմ (մուրճի պատկերակ): For drilling into masonry, brick, and concrete. This mode combines rotary action with a hammering motion.
5.4 Տուրբո ռեժիմ
The Turbo Mode button, located on top of the drill, provides an immediate increase in speed for faster results when needed.
- Սեղմեք ՏՈՒՐԲՈ button during operation to engage maximum speed.
- Release the button to return to the previously selected speed setting.

Figure 5: The Turbo Mode button, when pressed, provides increased speed for rapid task completion.
5.5 Anti-Kickback Feature
The drill is equipped with an advanced anti-kickback braking technology. If the drill bit binds during operation, the system will detect the sudden rotational force and rapidly stop the motor to reduce the risk of kickback and potential injury.
5.6 Ինտեգրված LED լույս
An LED light is integrated into the drill to illuminate the work area, improving visibility in dimly lit conditions. The light activates when the trigger is pressed.

Figure 6: The integrated LED light provides illumination for improved visibility in dark work environments.
5.7 Drilling into Masonry (Hammer Drill Mode)
When drilling into masonry, brick, or concrete:
- Select Hammer Drill Mode.
- Ensure the auxiliary handle is securely attached and held firmly with both hands.
- Use appropriate masonry drill bits.
- Apply steady, firm pressure to the drill, allowing the hammering action to break up the material.

Figure 7: The FLEX hammer drill in action, demonstrating its capability to drill into tough materials with 1,400 in-lbs of torque.
6. Պահպանում
6.1 Մաքրում
- Մաքրում կամ սպասարկում կատարելուց առաջ միշտ անջատեք մարտկոցի փաթեթը։
- Օդափոխման անցքերը փոշուց և բեկորներից մաքրելու համար օգտագործեք փափուկ խոզանակ կամ սեղմված օդ։
- Մաքրեք գործիքի պատյանը գովազդովamp կտոր. Մի օգտագործեք կոպիտ քիմիական կամ հղկող մաքրող միջոցներ:
- Պահեք մամլիչի ծնոտները մաքուր և առանց աղբի՝ գլխիկի պատշաճ ամրացումն ապահովելու համար։
6.2 Պահպանում
- Store the tool, batteries, and charger in a cool, dry place, away from direct sunlight and moisture.
- Ensure batteries are partially charged (not fully depleted or fully charged for long-term storage) before storing.
- Store the tool in its carrying case to protect it from damage.
7: Անսարքություն
| Խնդիր | Հնարավոր պատճառ | Լուծում |
|---|---|---|
| Հորատը չի սկսվում։ | Մարտկոցը լիցքավորված չէ կամ սխալ է տեղադրված։ Forward/Reverse selector in center (locked) position. | Charge battery and ensure it is securely installed. Move selector to forward or reverse position. |
| Գործողության ընթացքում էլեկտրաէներգիայի կորուստ: | Մարտկոցի լիցքը ցածր է: Ակտիվացված է գերբեռնվածության պաշտպանությունը: | Լիցքավորեք մարտկոցը: Նվազեցրեք գործիքի վրա ճնշումը, թողեք, որ այն սառչի։ |
| Կծիկը սահում է պտուտակի մեջ։ | Կեռիկը բավականաչափ չի ամրացված։ Չակ ծնոտները կեղտոտ են կամ մաշված։ | Նորից ամուր ամրացրեք ամրակը։ Մաքրեք սեղմակի ծնոտները։ Եթե խնդիրը շարունակվում է, սեղմակը կարող է փոխարինման կարիք ունենալ։ |
| Չափազանց թրթռում կամ աղմուկ: | Damaged or bent drill bit. Չամրացված բաղադրիչներ. | Replace drill bit. Check for loose screws or parts. If problem persists, discontinue use and contact service. |
8. Տեխնիկական պայմաններ
| Առանձնահատկություն | Մանրամասն |
|---|---|
| Մոդելի համարը | FX1271T-2B |
| Հատtage | 24 վոլտ |
| Չակի չափը | 1/2 դյույմ |
| Chuck տեսակը | Full-Metal Ratcheting |
| Առավելագույն ոլորող մոմենտ | 1400 դյույմ ֆունտ |
| Պտտման առավելագույն արագություն | 2500 rpm |
| Արագությունների քանակը | 2 |
| Մարտկոցի տարողունակություն (ներառված է) | 2.5 Ah, 5.0 Ah Lithium-Ion |
| Charger Type (Included) | 160 Վտ արագ լիցքավորիչ |
| Հատուկ առանձնահատկություններ | Turbo Mode, Anti-Kickback, LED Light, Brushless Motor |
| Նյութի քաշը | 15.37 ֆունտ (հավաքածու) |
| Ապրանքի չափերը | 7.2"L x 4"W x 10"H (Tool) |
| Հորատման հզորություն (փայտ) | 2 դյույմ |
| Հորատման հզորություն (մետաղ) | 2 դյույմ |
9. Երաշխիք և աջակցություն
9.1 FLEX սահմանափակ ցմահ երաշխիք
This FLEX tool is protected by the FLEX Limited Lifetime Warranty. To qualify for this warranty, you must register your new FLEX tool, battery, or charger within 30 days of purchase through December 31, 2025. Registration can be completed at registermyFLEX.com.
Please refer to the official FLEX website or your product packaging for full terms and conditions of the warranty.
9.2 Հաճախորդների աջակցություն
For technical assistance, replacement parts, or warranty claims, please contact FLEX customer support. Contact information can typically be found on the FLEX official webկայքում կամ ձեր ապրանքի փաթեթավորման վրա։
When contacting support, please have your model number (FX1271T-2B) and purchase date available.